Showing posts with label Weekly Project. Show all posts

Friday, December 16

Decorating with Ornaments

I love Christmas. I love the lights, the garland, the trees, the snow (though we're lacking that at the moment), the baking, and the movies. But what I'm discovering is that the degree of busyness around the holiday season seems to grow exponentially with my age! I really hope that I can get a bit more organized and prepared before next year rolls around! With custom artwork requests, graphic design gigs, and making the majority of gifts, there's not much time to truly enjoy all that I love about the season. But, I did have the chance to make this with my mom as a lovely centerpiece and decoration for the table.

Photo from The Home Depot's Website
Big, beautiful, festive centerpieces always bring a smile to people's faces, and we all would love to make fabulous HGTV-worthy table-toppers, but who has room on the table for one? Once all the plates, cups, wine glasses, wine, oh, and food - all get on the table, there's not much room left to spare! And if you go for a piece that's too tall, you can't see all those smiling faces around the table. Solution? Hang it! I saw this  (see Left) on a Home Depot commercial and instantly loved it. Theirs is much more intricate with different colored/shaped ornaments and someone who is probably at the same skill level as Martha Stewart, but I think ours turned out pretty nice.

So here's how you do it!

Materials:
  • Fishing line
  • Bulbs (We bought a batch of 50 from Hobby Lobby and had a few to spare for decorating garland.)
  • Chandelier (If you lack a dangling light fixture, I'm sure you could fashion a brace of sorts out of cross stitch hoops or sticks.)
  • PATIENCE
  • Christmas music (trust me, you'll need it to motivate you once your shoulders start getting weary. For me, that was at the 4th bulb.)
Step 1: "Measure"
Determine where you want the lowest bulb to hang. We had my dad sit in his seat to direct us on what the proper height was. Last thing you want is to do allllll this work just to have the bottom bulbs still blocking the view! It would be wise to actually measure where this point is, but we went the guess-and-check route.

Step 2: Start it up.
Start with the top bulb. Tie your fishing line to the hanging apparatus of the bulb and position it just below the chandelier in the center.

Step 3: Create the levels!
Now, the number of bulbs per level will be determined by your hanging structure. Our chandelier has 8 arms, so we worked in groups of 4 and altered the arms used per level (so if the top level is on arms 1,3,5,7 then the next level with be on 2,4,6,8. So on and so forth). Cut a generous amount of fishing line and tie it to your bulbs. Loop it over the inner-most area on the arm of the chandelier and adjust the height as necessary. Secure once you're happy with where it sits.

Step 4:
Repeat Step 3, but hang the bulbs further out on the arms (by about an inch or so depending) and with longer lines so the level will be about 3 or so inches lower than the level above. Repeat this step until you've made the tree as big as you like.

Step 5: Fill 'er in!
This part is kind of tricky. It helps to have a second set of eyes on the ground checking for where the bulbs should go. Basically, hang bulbs in the center area of the "tree"to fill in the empty gaps. We only had to add about 5 or 6 bulbs.

Step 6: Trim your centerpiece
Trim off the excess ends of the fishing line, step back and enjoy your lovely new creation!

Not the best of photos, but it'll do!
If you check out the link on The Home Depot's page, there's another tutorial using s-hooks and it looks much cleaner than our make-shift version. And there's a video!

I would LOVE to do this ornament frame project as well! But that may have to be saved for next year...
Photo from The Home Depot's website

Friday, July 8

It's up! It's up!

The long wait is over! My Etsy site has officially launched, and within a few moments of posting, I already have become a favorite by a few members!! I'm so excited about this site as it's a huge step in my creative goals. So go ahead and check out what I have listed. As a reader of my blog, you can get 15% off any order - including custom pieces! Enter coupon code C2OBLOG. Also, if you're within a 30 mile radius of Lansing, MI, I will deliver the piece myself for FREE! Just enter LOCAL30 as your coupon code. Here are a few highlights of what I listed, enjoy!


Sunday, June 19

Mural, mural, on the wall...

Hello there! I just finished a mural for Gear Up College Day Camp at MSU and have to show it off. This thing was the 2nd largest mural I've done (largest being 12' x 7') and the beach scene was a blast to do. It's for a luau party, so I thought, "What better than a beach sunset?" I absolutely love painting sunsets. They're are quite possibly the most amazing moment of my day. Living on a body of water makes it even more magical, although the Rocky Mountains have breathtaking sunsets as well (though I prefer the sunrises in Colorado).

This was my first mural. I designed it while on a missions trip in Gulkana, Alaska. Everyone pitched in with painting it and the villagers loved it! This was the bus stop for the village children, and was just a plain shed before we got our hands on it!

Just after I moved back from Colorado, I had the opportunity to paint several murals in a residence. Here's one of them:

And now, to the most recent! I was so excited when my friend asked me to do a backdrop/mural for the program she works in. Gear Up is such a great program, and the people are wonderful! I had the chance to go to hang out with them this past weekend and we all had so much fun! Without further adieu, here it is - the progression of a mural!


Ta-daa!!

The kids I babysit for - they LOVED it!
Painting is such a release for me - especially large scale paintings. And I definitely needed that stress-reducer after the past few, well, months. But an even better way to calm down, regroup, and reload? VACATION!! I'm leaving tomorrow on a road trip for one of my best friends' wedding in Montana! Justin and I are driving out and will arrive on Wednesday. I can't wait to see everyone! And it's in Kalispell, aka: Glacier National Park! I bet there will be some pretty awesome sunsets to inspire me. =)

Quick update for those who are waiting for my Etsy site to launch: I'll be posting everything at the beginning of July. Since I'll be gone for a week and a half, I'd rather not put up the shop and then make any orders wait until I return. So it will be up there soon and thanks for your patience! "See" you all soon!

Thursday, May 19

Breathe in, breathe out, repeat as needed...

It's one of those weeks where I keep telling myself "just make it through the weekend..." That's pretty much been my life since January. I'm SO exhausted, but also excited. It's at this time I turn to age-old words of wisdom. "Whatever doesn't kill you makes you stronger." Right, I'll keep that in mind. And then there's, "If you do what you love, you'll never work a day in your life." Sure... Well let's focus on this one: "This too shall pass." Phew, okay. Just get through this week... =)

The chaos that is crayon art. The mess extends beyond the
boundaries of this photo.

One of the things that's bogging my mind is this weekend when I'll have art displayed for the East Lansing Art Festival! It will be located within Blue Midnight (the hookah club across from the Mariott) on Saturday and Sunday. My "krayon art" (I'm debating spelling it with a k... I know it's a little tacky) will be displayed along with artists from Bossa Koba. I've never been part of an art show before, and am SUPER excited! I've been lining up, attaching, and melting crayons for the past few days and still have many more pieces to finish up tonight so they'll be ready to set up Saturday morning! And, after the weekend, whatever doesn't sell at the art festival will be put up on my Etsy site. So keep an eye out for the new site, it'll be here soon! 

Sunday, April 24

Happy Easter!

Can you believe it's Easter already?? I sure can't... it means that I've officially entered what has been dubbed "Birthday Week." I'm not sure what it is about late July/early August that is so tantalizing, but come late April, there are A LOT of birthdays around here! Growing up, this time of year was filled with cupcakes and class parties. Four other people shared my birthday (the 28th!) in my graduating class alone, not to mention the several others who had birthdays within a week of that! It was kind of an awesome thing to celebrate all together and I wouldn't trade my birthday for a "rarer" one (do "rare" birthdays exist? I believe laws of probability would say "no"). What I love about so many birthdays being close together means more people are celebrating and enjoying themselves during that time. Hands-down, the best birthdays were those celebrated out in Colorado. This is because "birthday week" became exactly that - a week long celebration of several birthdays with my roommates. One on the 24th (Happy Birthday Julianne!!), another on the 26th (Happy early Birthday Mandy!), and mine on the 28th. It. Was. Awesome. I miss my birthday week buddies...


Like I said, I can't believe it's Easter - and Birthday Week - already! I did exactly one thing to prepare for Easter: Glitter eggs. Yup. Found a kit at Meijer for GLITTER EGGS! Do you know how excited I was to see these?? Actually, I'm pretty sure that I made no outward sign of excitement. It was just that I saw the kit, and within two seconds it was in my hand. Not in the cart - in my hand. And the eggs are so beautiful! I highly recommend this kit to anyone who enjoys sparkles, but not to those who dislike glitter's "automatically-and-permanently-attached-to-everything" attribute.


I hope you all have a wonderful Easter and that your Spring is a little less soggy than mine! Seriously, I know the adage "April showers bring May flowers," but I really wasn't expecting THIS many showers - AND SNOW! Oi. I'll just cling to the hope that May will be full of beautiful blooms, and then *sigh* sweet, sweet summertime... Can't wait! 

Wednesday, March 9

Wedding Flowers


You do not have to be an expert to do this project, I certainly wasn't! My experience in arranging flowers was limited to taking store-bought bouquets and setting them in water. So have no fear, creating your own bouquets is simple and fun!

Colby being a big helper   =)
One of my closest friends said "I do" last week, and I offered to take care of the flowers. The wedding was very intimate, so the requirements were only the bride and maid of honor's bouquet, and the boutonnieres for the groom and the mothers (the other gentlemen had kerchiefs).


Here's what you'll need (I'm including the craft store prices):
  • Flowers (real, fake, or a mix)
  • Stem cutters (if you're using fake flowers, make sure your tool can cut through wire fairly easily)
  • Vase(s)
  • 24 gauge Floral wire, $3
  • Floral tape, $2
  • Ribbon (5/8" wide for bouquet, 1/4" wide for boutonnieres), $1
  • Straight pins, $1.50
  • Decorative straight pins (optional), $3

Step One: Choose Your Blooms
Flowers can take up a BIG chunk of the wedding cost, so any way a budget-savvy bride can save is much appreciated. Fake flowers can do the trick, but you can't beat the beauty and look of real flowers. As a compromise, I made the majority of the bouquet out of real flowers and used silk flowers as accents to pull in the wedding color. The trick in combining fake flowers with real is to make sure none of the big blooms are falsies. I chose very small flowers to be the fake ones and made sure the main eye-catchers were real.  Good looking silk flowers typically run from $2-$5 a stem, but you can ALWAYS find them on sale for 50% at chain craft stores (just keep an eye on your local adds).


I chose lilies, daisies and mums (all white) as my main flowers. Then chose some accent greenery that was also real. The fakes are all the blue flowers. Note how they are all smaller than the main flowers. This is also a way to provide some balance so the colorful blooms don't overpower the whole arrangement.

Step Two: Arrange Your Bouquet
This is best done using a vase that has a mouth about the size of (or slightly larger than) the size you want the handle of the bouquet to be. Start with your showcase flowers, typically the largest blooms. For me, it was the lilies.


Then, add in your blooms going from largest to smallest and ending with the greenery.


Step Three: Wire the Stems Together
Use floral wire to secure the stems together and ensure your arrangement stays in place.


Step Four: Wrap Base In Floral Tape.
Self explanatory. Use a straight pin to secure the end, wrap overlap the tape as you wrap it down the base, and up again for good measure. Once you've wrapped the entire base, secure again with a straight pin. Be sure all gaps are covered and any bumps are smoothed out.

Step Five: Wrap Base with Ribbon
The color is up to you (obviously), but I chose the wedding color that was also used for the accent flowers. You can secure this ribbon with simple straight pis, or go the fancier route and use a decorative pin. I chose pearls because they're simple and elegant, a classic wedding choice. To make sure none of the ribbons slipped, I inserted pins in a straight line down the entire base.


Pin tip! Be sure to angle the pins. No one like to be stabbed while walking down the isle. I angled all of mine downward except the bottom which was angled up. Common sense, but dangerous if you don't pay attention to it!


Boutonnieres:
The only differences in creating boutonnieres is in the beginning stages. You start by making a "bed" of your greenery, then laying the other flowers on top. It's a bit trickier to wrap the boutonnieres, so be patient. Also, use 1/4" ribbon when wrapping to reduce bunching.

Tip! It's best to do all the arranging the day before (or of!) your event so the flowers remain fresh and beautiful. Store them in a refrigerator with a damp paper towel at the base of the stems until it's time for the flowers to make their debut. 

That's all there is to it! This whole project ran me around $35, and I splurged a bit on some nice lilies from a local flower shoppe, but the end result was better than I expected! Especially for never having done anything like this before. My friend's wedding was lovely, and once the pictures are available, I'll post some so y'all can see the bouquets in action! 

Wednesday, February 23

Yup, I built a wall.

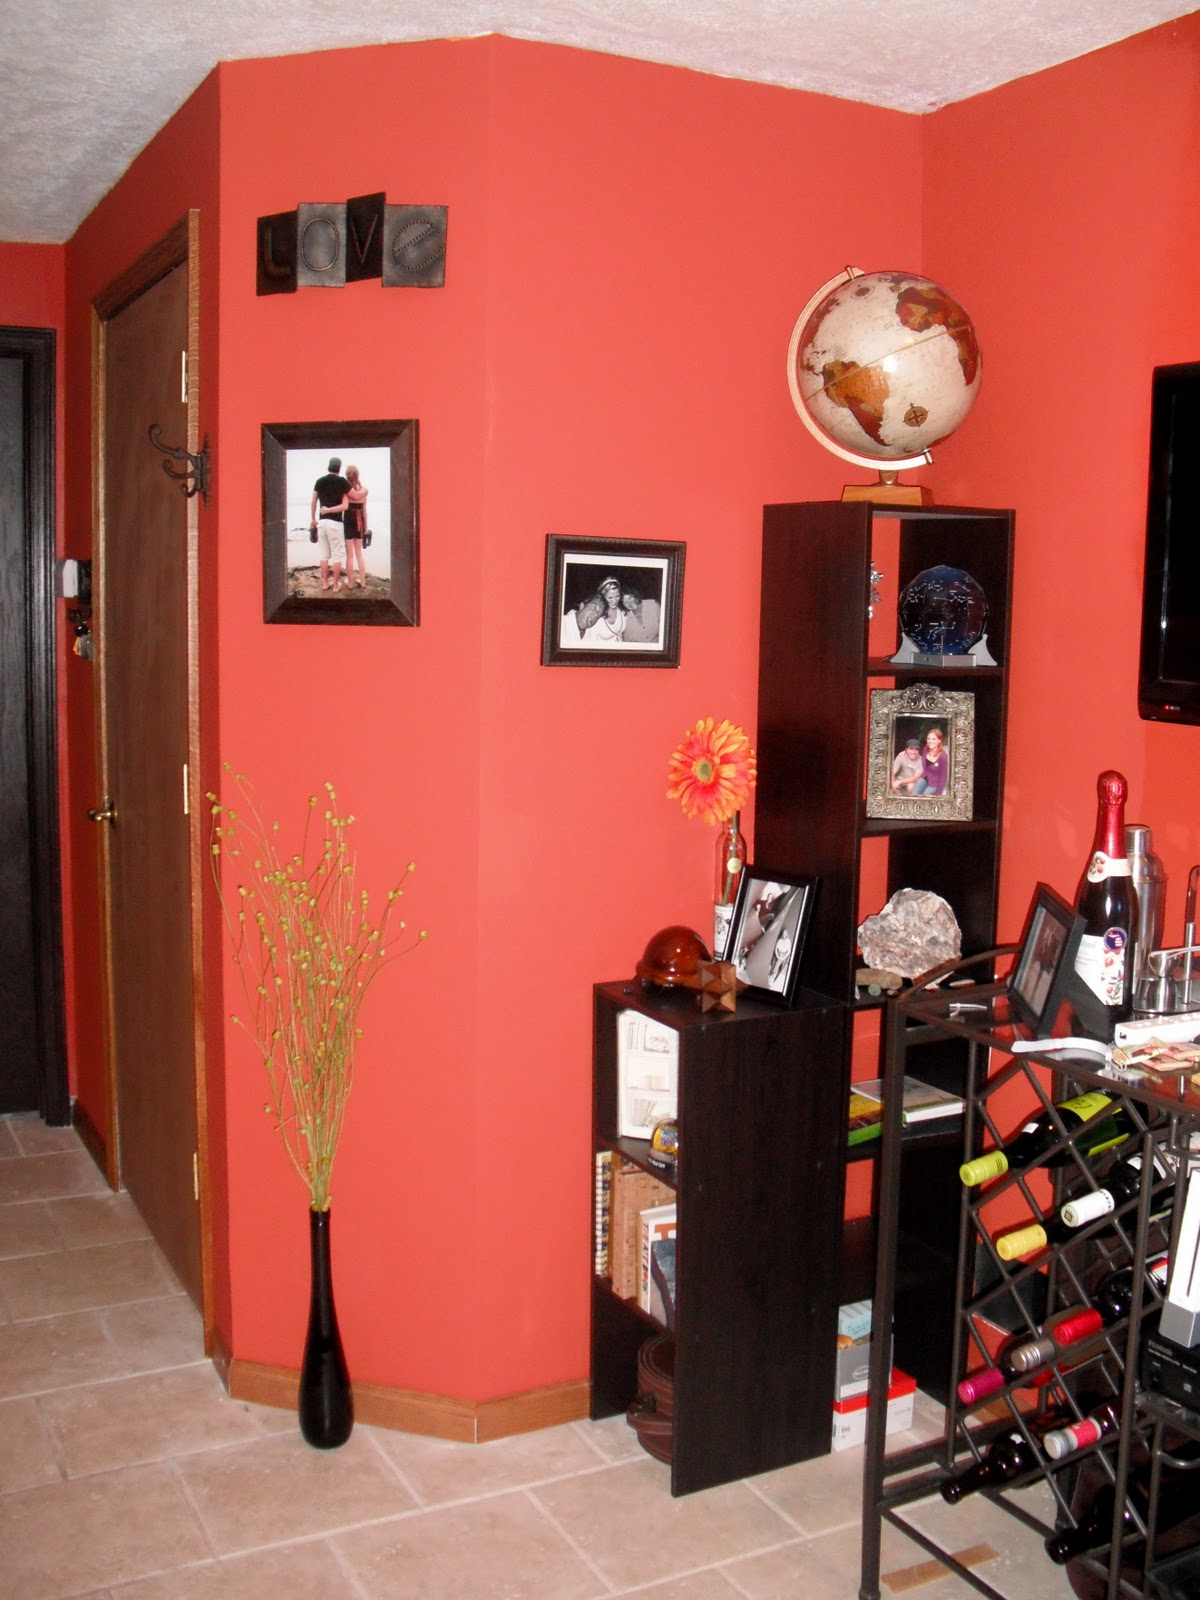
So...it's been awhile. I apologize for that, and now it's time for me to roll out the excuses. I've been CRAZY busy! And I'll admit, I've only done ONE creative project since my last post, which I'll show you today. It's not the custom sign that I promised you, it's much, MUCH bigger than that! My boyfriend and I, with the help of some friends, built a dividing wall equipped with a door!! I still can't believe we did it... but it looks amazing. We wanted to have it completed before last weekend because family was coming to visit, so the past few weeks have been pretty occupied with it. There was a issue with the door, a drywall debacle, and mismatched paint, but it all was very serendipitous and worked out! So here are some pictures:
Our apartment in the background is was TRASHED throughout this entire process!
But it was worth it.


This was when the drywall was done without the mud. The mudding was the WORST part! I highly recommend using a professional if you are inexperienced in drywall. We used Rich & Sons Drywall and he came out last minute on VALENTINE'S DAY to fix all of our mistakes and showed us how to do it properly. Rich is an amazing man and I recommend him to anyone looking for drywall in the Lansing area. 

THE FINISHED PRODUCT!! Woohoo!!


I am so happy with how this turned out. The best part was, of course, the decorating! I raided the clearance sections & sales at Hobby Lobby for the wall decor and vase (which I love!), and the shelving is my favorite new feature. The corner is kind of an awkward space, and there's not much room between the wall and our wine rack/entertainment center, so I didn't want something bulky. Or expensive. Plus, I wanted shelving that faced out from both faces of the wall. Since it's doubtful that I would be able to find something so unique within the price range I was looking for (CHEAP), it was time to get resourceful.

My friend had recently purchased one of the cube shelving units and I instantly liked it. So cute, decorative, and functional. Unfortunately, my space was too small for it. I went to the section in Target where the cube storage was, and found these small shelving units. They were the exact finish I wanted (Espresso) and perfect dimensions so they wouldn't stick out too far in either direction (about 11.5"x12.5"). I saw how I could fit the pieces together in my head, brought them home, set 'em up, and voila! The exact shelving unit I wanted! Two of them are stacked and facing toward the TV, and on is set against the side of the stacked ones, facing out toward the living room.

The price was decent, each small unit was $15 at Target. I saw them at Meijer for $12, just none in the correct finish. So for $45, I had my new piece! There are so many ways to combine these shelves, and different shapes are available so you can create your custom unit. I purchased the ClosetMaid brand and am really happy with them. A few years ago I combined one of these shelves with a hutch on top of my desk and they are still structurally sound! Not bad for the price.

Well, now that the wall is out of my schedule, I'm hoping to get back on track with more projects and blog posts. I hope you all have been having a wonderful February and are staying warm! 

Saturday, January 29

Grocery Lists

Ok, so I know I promised a blog regarding "making a custom sign," but another project popped in my head that took precedence. So the sign project will just have to wait a few more days. The other project is one that can help anyone who has to go searching through cabinets or the fridge to figure out what you need from the store. A LIST! Well, really it's more than a list. It's multiple lists: one for each area that you keep food (fridge, lazy susan, pantry, etc) and is comprised of your "staples" that hold your kitchen, and life, together. It may sounds stupidly simple, but it's a total timesaver!
I'm sure some of you are super efficient at keeping a grocery list up-to-date as you need supplies (and it never ever looks like the pic to the left...), but in this household, we're not. These lists are constructed so that when we run out of something, or we notice we've run out of something, we check it off on the list. Then, when grocery day comes, or when figuring out what to make for dinner, we'll know what items we're out of. You can make these lists for anything: bathroom, tools & hardware, office supplies, etc.

Step 1: Go through your kitchen and find out the main areas you store food or supplies that need semi-frequent replenishment. Or, you can go the category route (Vegetables, Fruits, Canned Goods, etc). For my lists, I used these labels for the storage sections: Refrigerator, Freezer, Spices, Baking Supplies, Dry Goods, Pantry, Lazy Susan, Medicine & Vitamins, and Cleaning Supplies.

Step 2: List out your staples for each of these sections. To avoid lists comprised of just a few items, I combined some items onto other lists (e.g. putting potatoes and onions under the Refrigerator section, and tea under Medicine & Vitamins). My definition of a staple item is something that you'd require at least once every two months. You can visit some sites that have printable lists as well, just make sure your favorite items are incorporated. Here's a bunch of free printable lists:
http://www.freeprintablegrocerylist.com/

Step 3: Type it up! Or write it out if you're super handy with a pen. You'll want the list organized so things are simple to find. I used the sorting tool in my word program to alphabetize each list. In front of each item, I placed a checkbox which will be used to mark off which items I need to purchase. Add any other decorations you'd like, just make sure you don't clutter-up your list.

Here's a tip! If you're alphabetizing, write out sub-categories of foods with their main category first. For example, if you want several types of cheese in the refrigerator, write them like this:
Cheese - Cheddar
Cheese - Mozzarella
Cheese - Swiss
This way, they're all grouped together and easier to locate. 

Step 4: Print out the list and laminate them. You can purchase contact paper or go fancy and buy your own laminating machine. (Teachers have the added bonus of using the machine at their school!) I opted for Kinkos. Fast, simple, and for less than $2 a sheet, I had professional-looking laminated lists.

Step 5: Hang lists inside the doors of the cabinets they correspond to (using tape or velcro). I attached my refrigerator and freezer lists to the inside of the pantry door. Inside the fridge would be inconvenient. Or, if you prefer, hang them all in one place so their grouped together. I like the lists inside their corresponding cabinets so that you can mark things off immediately.

Step 6: Attach a dry erase marker next to each list. This can be accomplished simply with tape and string (the route I chose), velcro, or you can make a pen loop at the bottom of the list. Of course, if you can always just make sure there's a dry erase marker in a nearby drawer.

That's it! No more digging through cabinets to see what you need to buy at the store, no more starting to make dinner only to find out you're missing one of the key ingredients. Naturally, this plan only works if everyone who uses the items in the kitchen utilizes it. So make sure everyone in your household knows the rules: if you use the last of something, check it off on the list. And if you notice something's gone, check it off on the list. 

I hope this is helpful to some of you, I know it's going to be a HUGE help for my home. To clue you in on how bad we needed this, we currently have four containers of crushed oregano.  All purchased at different times. Oi...

Hope you're weekend's going well, and check back later for that sign tutorial. I promise it will be here! =)

Saturday, January 22

Flower Power! I mean, pens! =)

A few years back, one of my close friends made me a bouquet of these flower pens and I LOVED them. Not only did they provide year-long color, they were incredibly fun to write with! Since then, I've seen flower pens at coffee shops, the pet store, and registers where any flower-loving person works. They're great! So to continue my "one project a week" as well as my "Pay It Forward" vow, I made a small set to pair with the notecards I made last week. For all of you looking for a quick, simple, and cute gift (even if it's for yourself), I'm including some step-by-step instructions.

Step 1: Choose your flowers! 
Obviously, you'll want to go with a fake flower, and it's best if the shape extends outward and drapes down slightly. Think daisy or lily. However, any flower will do. It's nice if you can find a bouquet already made, or, the "twist tie" versions that I found a Michael's. These were perfect because I didn't have to trim the stem to fit on the pen.

Step 2: Choose your pens and gather supplies. 
The pens don't have to be fancy, just grab a box of 20 for $3. As long as they write well, they're good. And it's nice to have a round barrel. The other supplies you'll need are floral tape (best if it's the sticky kind) and hot glue (yesssss).

Step 3: Attach flower to the pen.
Use your hot glue to affix the flower to the blunt end of the pen, utilizing the stem.

Step 4: Wrap the pen in floral tape. 
I highly recommend the sticky floral tape, however, Michael's was out of it when I stopped by, so I improvised. To work with non-sticky floral tape, I put a dab of hot glue at the tip of the pen (writing side), bonded the tape to it, and wrapped the pen up to the flower where I secured it with another dab of hot glue.

And you're done! Yay! So simple, right? To really embrace the pen bouquet idea, display them in a vase, or a flower pot filled with pebbles. Or, you can just have them hanging out on their own. =) They make excellent gifts or party favors, and the possibilities are endless! You can play with using ribbon instead of floral tape, combining multiple flowers on one pen, decorating a pot or vase to put them in, etc. I just love it! Or, if you're not so keen on crafting but you really dig these pens (ha, dig, get it?), there are professional flower pen crafters who sell them online. Here are just a few of the many shop sites:

Tanya's Bead 'n Craft
Favors by Serendipity
FlowerPens.com

Just to give you an idea of the many possibilities, here are some shots of other people's projects:


So much fun! I can't wait to experiment more with these. I have entire Saturday to do whatever I want, and I'm pretty sure crafting is on the schedule. The fact that it's 9° outside and snowing doesn't really make me want to leave the house. Although the movie theatre is pretty tempting... I hope you all have a wonderful weekend, and for those in the cold-weather areas, stay warm!

Saturday, January 8

Crayon Art

I have successfully kept my resolution for one week! Yay! Only 51 more to go...
For this week's project, I decided to do another melted crayon artwork. My boyfriend and I created one of these artworks awhile ago and it's currently displayed in our apartment, and I used a segment of it for the banner on this blog!

This project is SUPER easy to do and I'll outline the steps on here for anyone who'd like to try it for themselves.

Gather you supplies:
Hair dryer
Crayons
Board or firm canvas
Hot glue or superglue


The first step is to arrange the crayons in the order you'd like. I really love the way a rainbow type organization blends the colors. You csnt realy go wrong with it, but my friends tried this out and did some cool arrangements too (as pictured at the end of the blog).


Once you've decided what order you'd like the crayons in, glue them in place. It's best to glue down 2 or 3 crayons at a time so you can adjust the alignment if needed and the glue doesn't dry before you get the crayons on.


Now, you're free to heat p the crayons with the blow dryer! This can get messy, so lay down a tarp and wear clothes you don't mind getting crayon on. It takes a minute for the crayons to melt. I like to work in sections until the color flows are the way I like them.


It's so amazing watching the colors pour out of the crayon wrappers and blending together.


Since I promised to create six homemade items for six different people, I figured this would be an awesome creation to gift! I still need to spray a protective layer on it and probably frame it, but I love how this turned out!


Here are some other crayon artworks that my friends (more like family really) created after Justin and I told them how we created our piece. I think they did a great job! They actually removed the wrappers from the crayons, and the radial design is one I think I'll attempt next!


- Posted using BlogPress from my iPad. Because it's awesome.